

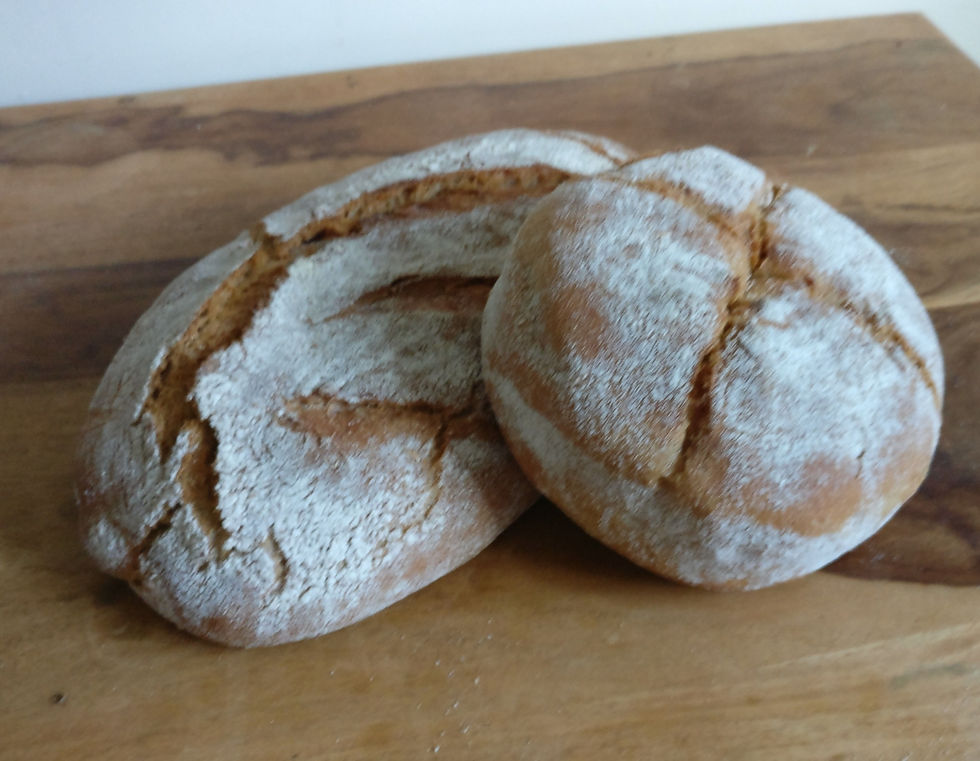
Our Basic SPELT Loaf

Before you begin
Spelt gluten structure differs from modern wheat. Compared to heritage grain, Spelt flour can develop a stretchier dough and is therefore easier for baking bread. Equipment and environment differ from home to home and, as is with any recipe, it takes time and practice to get to know your flour and method. We hope you enjoy your bake as you grow more confident with the feel and taste of Spelt.
There are various methods to create a soft Spelt dough and each have their pros and cons, depending on time and amount of dough you need. Having tried various methods, we use both the stretch and fold method by hand and a mixer for the recipe below. Click here to see a third method, 'Stretch, Fold and Rest', which involves less kneading. Instead, it takes folding at regular intervals. We have added the steps at the bottom of this page.
For learning to cut and shape the dough, see our video here. (This will open in a new window).
Get Ready
Basic SPELT Loaf
Ingredients for 1 x 2 Lb loaf:
500 g - White Spelt Flour
7 g - Yeast (Instant active)
7 g - Salt
320 ml - Water (hand warm)
1 Tbsp - Honey
1 Tbsp - Oil (olive/rapeseed)
TOTAL weight = approx 900g
Baking Equipment:
-
A bowl
-
a scraper (optional)
-
clean cloth/oiled plastic bag to cover the bowl
-
1 loaf tin/dutch oven (Spelt dough does not maintain its shape very well, so we recommend a tin. Try various ways and see what shape and size suits you best.
-
A little Oil to grease the tin/tray
Pre-heat:
Loaf - 240C
Rolls - 160C
Quick Steps
This is a simple checklist once you've got the hang of things. Use the detailed steps for further instructions.
Mix Flour & yeast: Add the yeast to the flour and mix well. Add the salt.
Add Water, Honey & Oil: Measure the water and stir in the honey, then the oil. Add the mixture to the flour and mix until there is no dry flour left.
Stretch & Fold: Work the dough by stretching and folding or use a mixer for about 10-15 minutes or until the dough comes off the bowl.
Rest: Place the dough into an oiled bowl and cover. Rest for about 40-60 minutes.
Shape & Divide: Depending on your intended bake, divide and shape the dough and place in a lightly oiled tin or floured Banneton.
Cover & rise for about 40 minutes.
Pre-heat the oven and heat the tin/pot.
Test the rise: Using your fingers, test the dough for readiness.
Steam the oven
Bake for 10 minutes and remove the steam tray, or remove the tin/pot lid.
Further Bake 10-25 minutes, removing the tin after the second 10 minutes to allow for browning.
Detailed Steps
Weigh the ingredients and keep them at hand.
Read through the steps to get to know how this method works and how best to plan your timing.

Mix & Work the Dough
-
Mix the yeast into the flour in a large bowl.
-
Measure the water and stir in the honey, then the oil. Add the mixture to the flour.
-
Gently mix or fold by hand by using a scraper until a you have a soft slightly sticky dough and there is no dry flour left.
-
TIP: If the dough is dry and stiff, Using a Mixer: add a teaspoon at a time of water to the mixer bowl, mixing in between until the dough is nice and soft. By Hand: dip your hand into water and keep mixing by hand, repeat until you have a softer dough. Avoid pouring water directly into the bowl from a jug or on the flour to avoid over watering, which would change the consistency too much.

Rest
-
Place the dough into an oiled bowl and cover with a thin cloth or clingfilm and leave to rest for 40 minutes, preferably in a warm place away from draughts.
-
By this time, the dough should have doubled in size and can have some bubbles showing. This can take longer or shorter depending on the temperature of the water and the room. It is best to check on it now and again to get to know your dough.

Divide
This next step is very simple and only needed if you want to bake more than one loaf, rolls, or for recipes that require you to divide the dough in smaller parts.
Divide
-
Using your hand or a scraper transfer the dough onto a lightly flour dusted work surface.
-
se either a scraper or sharp knife to cut the dough and weigh to the required amount.
Shape
(or see instructions below.)
Shape
-
Use your hand or a scraper to transfer the dough onto a lightly flour dusted work surface with the top side down on the surface.
-
Dust your hands a little with flour during this step so that the soft dough does not stick to your fingers.
Choose your shape:
Oblong Loaf
(or see instructions below.)


Rise
Once the shaped dough is safely tucked in a tin, basket or tray, cover and leave to rest in a warm place for about 40 minutes.
-
The timing when the dough is ready to bake is important and something you get used to know the more you bake.
-
Test the dough by pressing gently with a dry finger. If the dough bounces back gently, it is ready.
-
If the dough comes back very quickly without leaving a mark, it will need some more resting.
-
If the pressing leaves an indent that does not come back up, your dough is most likely risen too much.
-
It is better to bake the bread when is is slightly under risen than over risen, so it is important to keep an eye on it.
-
Pre-heat the oven about 10 mins before the end of the rise. (If using a roasting tin or covered pot place this in the oven to pre-heat, see next step.)
-
1) Steaming the oven using a tray of water for about 5 minutes before the bake. You can either fill an oven proof dish/ tray with water and place it near the bottom of the oven.


Bake
Your preheated oven should be ready for the bake. (see above for temperatures on your chosen bake)
Options we recommend To give the loaf an oven spring (a quick initial rise) before the sugar in the dough begins to caramelise which forms a crust and stops the dough from rising further:
Bake the bread for 10 minutes with the water tray in the oven.
Remove the tray and bake for a further 10 minutes then remove the bread tin and continue to bake for another 10-15 minutes.
2) Steaming the oven using a spray bottle by generously spraying water into the oven, as soon as the bread is placed in the oven, being careful not to spray the dough or it will be wet. Follow the Bake instructions as above in step 1.
3) Using a roasting tin/ covered pot.
Using oven gloves, remove the now very hot tin/pot from the oven and remove the lid. Carefully turn the banneton upside down over the tin and tip the loaf in the centre. Replace the lid and put in the oven for about 10 minutes.
Remove the lid, loosen the gently with e wooden spoon and bake for a further 15 minutes uncovered.
Oblong loaf


Shaping an Oblong Loaf
-
Gently pat the dough with the palm of your hands to flatten into a rough rectangle, with the short side to you.
-
Fold the far end of the dough towards you to cover two-thirds of the dough. Fold the remaining dough from your side to cover the folded dough.
-
Turn the dough so short side is to you and repeat the fold as in step 2 but the shape will now be more like a square.
-
With the palm of your hand (not your fingers) gently pad down the dough to become slightly large and flatter.
-
Pull out the corners slightly to form four corners. Holding the opposite corners, left and right, bring one corner to the centre and pull the other corner over the top. Then with your fingers press a horizontal line in the middle to form a spine.
-
Press again. Bring the top into the centre and gently press into the spine.
-
Place your thumbs in the spine and slide/turn the dough around. (Always work toward you)
-
Fold the top again to the centre, and then again so the outer side becomes nice and tight.
-
Roll the dough to bring the edge under, gently roll to seal the edge.
-
Dust with flour.
-
If using a Banneton proving basket: Dust the basket generously with flour to avoid the dough sticking to the basket, or use a cloth.
-
If using a tin: Grease the tin with a little oil. Place the dough with the spine down in the tin and cover with a cloth or oiled clingfilm/plastic bag.
-
Continue to follow the 'Rest and Rise' instructions above.
Round Loaf


Shaping a Round Loaf
-
Gently pat the dough with the palm of your hands to flatten into a rough circle.
-
Fold the far end of the dough into the centre.
-
Turn the dough a little and repeat folding the dough to the centre until all sides have been folded in at least once. This creates the round shape and brings tension on the top of the loaf (which is underneath at the moment) which you need for a good rise and bake.
-
Dust with flour.
-
If using a Banneton proving basket: Dust the basket generously with flour to avoid the dough sticking to the basket, or use a cloth.
-
If using a tin: Grease the tin with a little oil. Place the dough with the spine down in the tin and cover with a cloth or oiled clingfilm/plastic bag.
-
Continue to follow the 'Rest and Rise' instructions above.
Rolls


Dividing and Shaping Rolls
-
Gently pat the dough with the palm of your hands to flatten into a rough rectangle, with the short side to you.
-
Fold the far end of the dough towards you to cover two-thirds of the dough. Fold the remaining dough from your side to cover the folded dough.
-
Weigh the dough and work out how many rolls you want to make. I like to make about 90g rolls. For example: Total weight of the dough = 900g : 90g = 10 rolls.
-
Using your scraper or a knife cut the now oblong dough lengthways into two long sausage shapes.
-
With your fingers or the base of your thumb, seal the open edge down and gently roll it so that there are no sticky sides.
-
Cut each dough strip into 5 pieces, depending on how big you want your rolls. (If you want, weigh each piece after cutting it and adjust the weight to suit.)
-
Again seal the edge down and fold the edge to the centre, creating a small round ball
-
Turn it over and with the round side against the palm of your hand, roll the dough in a circular motion to finish.
-
Using a tin: Grease the tin with a little oil. Place each dough ball with the spine down evenly spaced in the tin. Allow enough space for the dough to rise and bake.
-
Cover the tin loosely with a cloth or oiled clingfilm/plastic bag.
-
Continue to follow the 'Rest and Rise' instructions above.
THIRD METHOD
STRETCH, FOLD AND REST.
Quick Steps
This is a simple checklist once you've got the hang of things. Use the detailed steps for further instructions.
Mix & Rest: Add ingredients to the water in a bowl and mix till all the water is absorbed. Cover and rest for 40 minutes
Add Salt & Oil: Sprinkle the salt on the dough in 3 parts, massage and stretch & fold in between. Do the same with the oil. Cover and rest for 15 minutes.
Fold & Rest: Continue to Fold 4 times and Rest for 15 minutes, repeat four times.
Shape & Divide: Depending on your intended bake, divide and shape the dough and place in a lightly oiled tin or floured banneton.
Cover & rise for about 40 minutes.
Pre-heat the oven and heat the tin/pot.
Test the rise: Using your fingers, test the dough for readiness.
Steam the oven
Bake for 10 minutes and remove the steam tray, or remove the tin/pot lid.
Further Bake 10-25 minutes, removing the tin after the second 10 minutes to allow for browning.
Mix & Rest
-
Mix the yeast into the flour.
-
Put the water in a large bowl.
-
Then the flour & yeast mixture.
-
Gently mix and fold by hand or using a scraper until a you have a soft slightly sticky dough and there is no dry flour left.
-
If the dough is dry and stiff, dip your hand into water and keep mixing. Avoid pouring water directly into the bowl to avoid over watering, which would change the consistency too much.
-
Cover the bowl with a thin cloth or clingfilm and leave to rest for 40 minutes. This allows the gluten to develop before the salt is added.


Add Salt & Oil
Salt is added later as it slows the yeast down. This gives the dough the best chance to ferment.
Adding the salt at this stage will give the dough a more consistent rise:
-
Sprinkle roughly a third of the salt onto the dough and with slight wet fingers massage the salt into the dough. You will see it being absorbed pretty quickly.
-
Lightly fold one side over the dough, by tucking your hand behind the side of the dough and gently holding and stretching it over to the other side.
-
Sprinkle another third on the dough and repeat as before, but turn the bowl to stretch a different side over the dough. Then add the rest of the of the salt and repeat massaging it in.
-
Do the same with the oil but add all the oil at once. Don't worry if the dough becomes very glossy and oily, as it will be fully absorbed during the next Fold & Rest steps.


Fold & Rest
Once the salt is added do a four side stretch and fold:
This process is done instead of kneading which is a gentler way to distribute the ingredients and allows the yeast to slowly digest the sugar and develop the gluten. This is a preferred method for both Ancient and heritage flours because of their gluten structure.
-
As before, tuck your hand underneath the farside of the dough, lift and stretch the dough to the side nearest you.
-
Turn the bowl and repeat this process until all four sides of the dough have been stretched and folded over.
-
Leave to rest for 15 minutes.
-
Repeat this process three more times.
It may seem a long process, but it is lovely to watch the dough become softer and filled with beautiful ferment bubbles with each stretch and fold.